Introduction
Formik is a widely-used library for handling forms in React applications. It simplifies handling form state, validation, and submission, allowing developers to focus on building user interfaces. With Formik, you can easily manage form data, handle user inputs, and validate fields using either custom validation functions or schemas with Yup. It provides a set of components to streamline form handling, making it easier to build complex forms with less boilerplate code. Formik integrates smoothly with React and can be customized to fit various use cases and form requirements.
Prerequisites
- Node.js and npm
- React
- Typescript
- Formik
Understanding Forms & Form Handling Using Formik
Why React Alone Makes Form Handling Complex
Creating and handling forms with React is no fun. It is very verbose and rigid. Building the form and creating validation methods are boring tasks. In each form, you’d need to do the following, at a minimum:
- Set up state for form values, form errors, and form validity
- Handling user inputs and updating state
- Creating validation functions
- Handling submission
Building forms the natural React way requires you to write every part of the process from setting up states to form submission. I’ve built countless React forms, and I always find this part of the process tedious and time-consuming. One may have felt the same way too.
Formik to the Rescue
“Why” is one of the most crucial questions to ask when solving any problem.
There are quite a few reasons to learn Formik for the implementation of such systems, such as:
- Simplifies form development
Formik takes care of tedious tasks like tracking values, errors, and visited fields, and handling form submissions. This allows developers to spend less time on wiring up state and change handlers, and more time on business logic. - Easy to use
Formik has a minimal API surface area, making it easy to use, even for beginners. - Organizes form management
Formik keeps all the important aspects of form management in one place, making it easier to test, refactor, and reason about forms. - Field component
Formik’s Field component automatically connects to the Form component that wraps it, regardless of how deep the Field is in the tree.
Effortless Form Handling : See Formik in Action
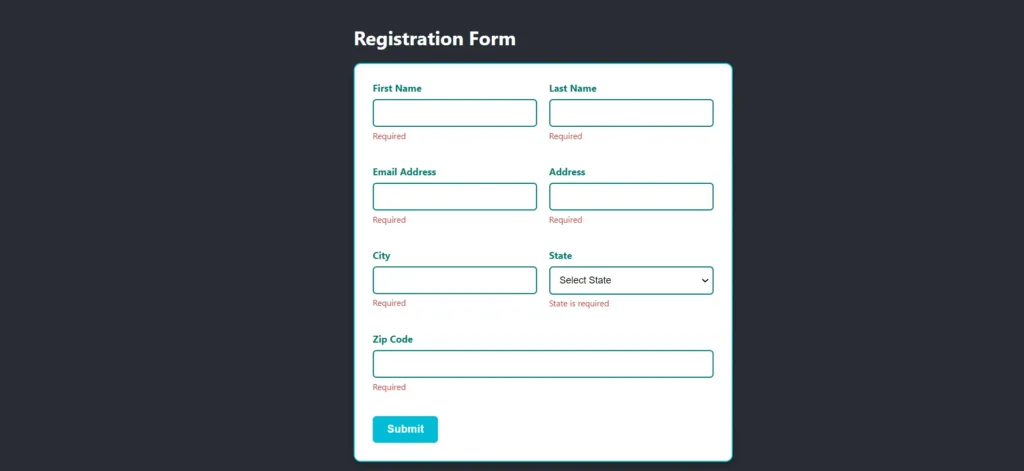
This application is a user registration platform designed to showcase the power and simplicity of Formik for handling forms in React with TypeScript. It features a clean, user-friendly registration form with fields for user details such as name, email, address, and more. Built with a React frontend and leveraging Formik’s minimal API, the app demonstrates how to efficiently manage form state, handle validation, and streamline user input processing. In this blog post, you’ll see how Formik simplifies form handling compared to using React alone, making form management intuitive and accessible. For a comprehensive guide on integrating Formik into your React TypeScript projects, follow along with this example.

Navigating the Frontend Setup In React
Let’s focus on implementing the registration form using React with TypeScript and Formik. We’ll build a user-friendly registration interface, leveraging Formik to manage form state and validation effortlessly. This guide will demonstrate how to streamline form handling and ensure a smooth user experience with minimal complexity.
Initializing React Application : To create a React application, you need to start by creating a project folder in your root directory
					//Create react app using the following command
npx create-react-app client --template typescript

//Install the required library
npm i formik
- Formik : Formik is a library for managing form state, validation, and submission in React applications, streamlining the form handling process.
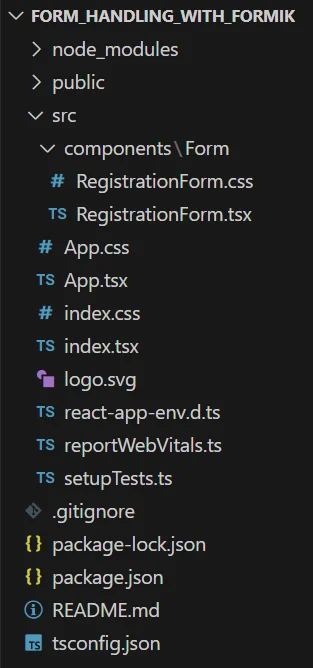
- Proceed with the following steps to create the registration form. In the project form_handling_with_formik folder, locate the App.tsx file which serves as the entry point for the project.
1) Create a separate folder named Form for the components where you will create the necessary components.
2) Inside that folder, create two files : RegistrationForm.tsx and RegistrationForm.css.
- RegistrationForm.tsx : This file will contain the React component for the registration form. It will handle the structure, logic, and behavior of the form, including input fields, validation, and event handling.
- RegistrationForm.css : This file will contain the styling rules for the RegistrationForm component.
3) In this app, raw css is used for styling. Design the user interface according to your preference using raw CSS or any library of your choice.
					// App.tsx

import RegistrationForm from './components/Form/RegistrationForm';
import './App.css';

function App() {
  return (
    <div className="App">
      <h1>Registration Form</h1>
      <RegistrationForm />
    </div>
  );
}

export default App;
- In the App component, we are rendering the RegistrationForm component, which is a part of our application’s UI for handling user registration.
					//RegistrationForm.tsx

import { Formik, Form, Field, ErrorMessage } from 'formik';

interface FormValues {
  firstName: string;
  lastName: string;
  email: string;
  address: string;
  city: string;
  state: string;
  zipCode: number;
}

interface FormErrors {
  firstName?: string;
  lastName?: string;
  email?: string;
  address?: string;
  city?: string;
  state?: string;
  zipCode?: string;
}

const validate = (values: FormValues): FormErrors => {
  const errors: FormErrors = {};

  if (!values.firstName.trim()) {
    errors.firstName = 'Required';
  } else if (values.firstName.trim().length > 15) {
    errors.firstName = 'Must be 15 characters or less';
  }

  if (!values.lastName.trim()) {
    errors.lastName = 'Required';
  } else if (values.lastName.trim().length > 20) {
    errors.lastName = 'Must be 20 characters or less';
  }

  if (!values.email.trim()) {
    errors.email = 'Required';
  } else if (!/^[A-Z0-9._%+-]+@[A-Z0-9.-]+\.[A-Z]{2,4}$/i.test(values.email)) {
    errors.email = 'Invalid email address';
  }

  if (!values.address.trim()) {
    errors.address = 'Required';
  } else if (values.address.trim().length > 20) {
    errors.address = 'Must be 20 characters or less';
  }

  if (!values.city.trim()) {
    errors.city = 'Required';
  } else if (values.city.trim().length > 20) {
    errors.city = 'Must be 20 characters or less';
  }

  if (!values.state) {
    errors.state = 'State is required';
  }

  if (values.zipCode === undefined || values.zipCode.toString().trim() === '') {
    errors.zipCode = 'Required';
  } else if (values.zipCode.toString().length > 20) {
    errors.zipCode = 'Must be 20 characters or less';
  }

  return errors;
};

const RegistrationForm: React.FC = () => {
  return (
    <div>
      <Formik
        initialValues={{
          firstName: '',
          lastName: '',
          email: '',
          address: '',
          city: '',
          state: '',
          zipCode: 0,
        }}
        validate={validate}
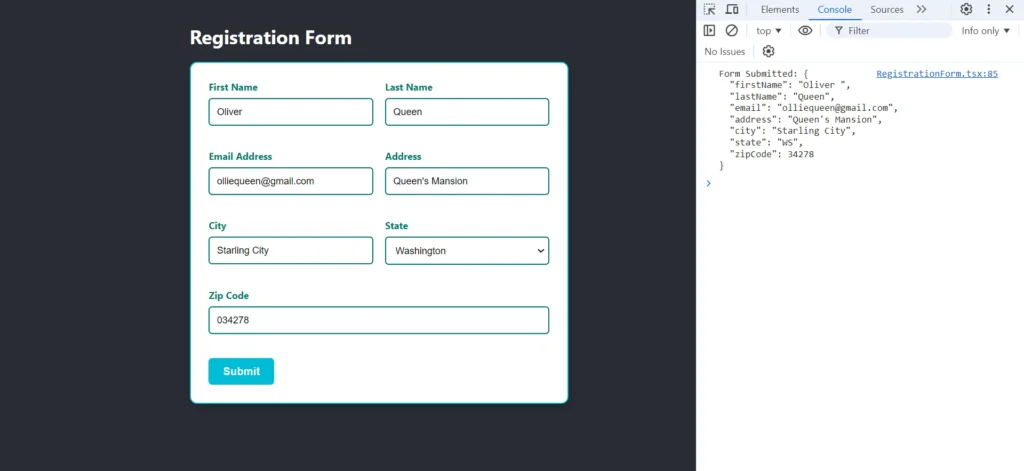
        onSubmit={(values) => {
          console.log('Form Submitted:', JSON.stringify(values, null, 2));
        }}
      >
        <Form>
          <div className="form-row">
            <div className="form-group">
              <label htmlFor="firstName">First Name</label>
              <Field name="firstName" type="text" />
              <ErrorMessage name="firstName" component="div" className="error-message" />
            </div>
            <div className="form-group">
              <label htmlFor="lastName">Last Name</label>
              <Field name="lastName" type="text" />
              <ErrorMessage name="lastName" component="div" className="error-message" />
            </div>
          </div>
          <div className="form-row">
            <div className="form-group">
              <label htmlFor="email">Email Address</label>
              <Field name="email" type="email" />
              <ErrorMessage name="email" component="div" className="error-message" />
            </div>
            <div className="form-group">
              <label htmlFor="address">Address</label>
              <Field name="address" type="text" />
              <ErrorMessage name="address" component="div" className="error-message" />
            </div>
          </div>
          <div className="form-row">
            <div className="form-group">
              <label htmlFor="city">City</label>
              <Field name="city" type="text" />
              <ErrorMessage name="city" component="div" className="error-message" />
            </div>
            <div className="form-group">
              <label htmlFor="state">State</label>
              <Field as="select" name="state">
                <option value="">Select State</option>
                <option value="GJ">Gujarat</option>
                <option value="MH">Maharashtra</option>
                <option value="UP">Uttar Pradesh</option>
              </Field>
              <ErrorMessage name="state" component="div" className="error-message" />
            </div>
          </div>
          <div className="form-group">
            <label htmlFor="zipCode">Zip Code</label>
            <Field name="zipCode" type="number" />
            <ErrorMessage name="zipCode" component="div" className="error-message" />
          </div>
          <button type="submit">Submit</button>
        </Form>
      </Formik>
    </div>
  );
};

export default RegistrationForm;
This RegistrationForm component is a React functional component that utilizes Formik for form handling. Here’s a breakdown of its components and how they work:
1. Imports
- Formik, Form, Field, and ErrorMessage are imported from Formik to manage form state, validation, and submission.
2. Validation Function
- A function that takes the form values as input and returns an object with any validation errors. It checks each field against specific rules
3. Formik Setup
- <Formik> : The Formik component wraps the entire form and provides context and functionality for form handling. It accepts the following props:
- initialValues : Specifies the initial state of the form fields.
- validate : The function used to validate the form data.
- onSubmit : A callback function that gets called when the form is submitted. Here, it simply logs the form values to the console.
4. Form Rendering
- <Form> : A wrapper component provided by Formik that handles form submission and state management.
- <Field> : A component for rendering form inputs and connecting them to Formik’s state management. It automatically handles changes and updates Formik’s internal state.
- For text inputs (like firstName, lastName, etc.), type=”text” is used.
- For the email field, type=”email” ensures that the input is validated as an email.
- For the zipCode field, type=”number” is used to accept numerical input.
- <ErrorMessage> : A component that displays validation error messages for the corresponding field. It takes the name prop to identify which field’s errors to display and component=”div” to render the error message as a div element.
5. Submit Button
- <button type=”submit”> : A standard submit button that triggers the form submission when clicked.
Output


Conclusion
In conclusion, we have effectively developed a registration form using Formik in React with TypeScript. By integrating Formik, we’ve streamlined form handling with easy validation and error management, enhancing both functionality and user experience. The form is designed to be clean, user-friendly, and efficient, making it a valuable addition to any project requiring robust form handling and validation. With this implementation, you can confidently manage user input and validation with minimal complexity and improved usability.


